How-To Guide
Customize Forms
- How-To Guide
- CUSTOMIZE FORMS
Once you’ve added the right questions to your form, it’s time to customize your questions. Whether you want to collect sales visit data, delivery information, mileage reports, or anything else, custom forms empower you to gather the exact information you need.
Not only can you add custom questions, but you can also create default answers or dynamic questions that change depending on factors like your real-time data or the user’s current location. Isn’t that incredible? Let’s get started so you can minimize data entry and streamline your processes.
QUESTION OPTIONS
At the top-right corner of each question, you’ll see a blue menu bar. Here, you can choose whether to make a question required, adjust the validation settings for that question, or delete the question altogether.
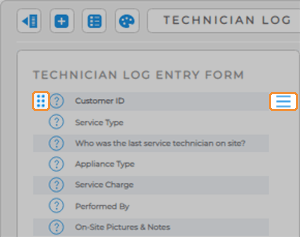
When you click on a question, an orange menu bar appears on the right-hand side. Here, you can duplicate the question, add or insert a new question, or import a question from an existing form.

REARRANGE QUESTIONS
All of your form questions are listed in the left-hand sidebar. Hover over a question and click the candy box icon to drag and rearrange questions.
Or, click the hamburger menu to reveal a shortcut to Duplicate or Remove a question.

ADD DYNAMIC QUESTIONS
Some question types have dynamic capabilities, meaning you can create answer options based on columns in your datasets.
Where applicable, this option appears when you click the blue + icon to add new answers.
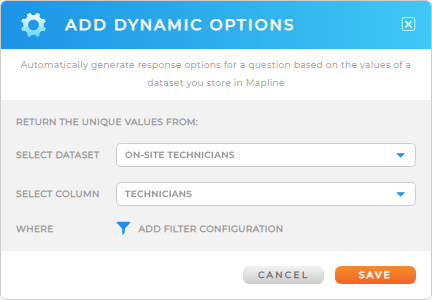
Select Dynamic Options, then choose the dataset and column from which you wish to generate answers.
For example, maybe you want to create a drop-down menu with the name of the technician. As techs fill out the form, they select their own name so they get credit for the service.
If one of your datasets already lists all of your technicians, simply select that dataset from the drop-down list, and then select the column that lists their names. Dynamic options are a fantastic way to keep your forms up-to-date, no matter how many times the original dataset changes!
Next, add any necessary filters, then click the orange Save button at the bottom-right of the Add Dynamic Options window to apply your changes.

ADD DEFAULT VALUES
One of the most powerful ways to streamline your data collection is by adding default values to your forms.
Default values empower you to pre-fill forms with default answers, making it faster and easier for your users to fill out the form. This is particularly helpful if your team fills out the same form every time they complete a job.
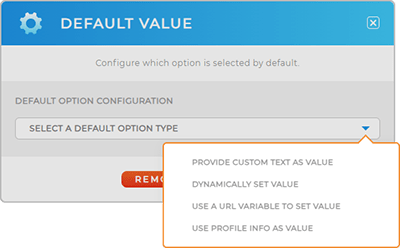
First, click on the question you’d like to edit. Click the blue SETTINGS icon and select SET DEFAULT OPTION.
Now, choose they type of default option you’d like to add:
- PROVIDE CUSTOM TEXT AS VALUE: Manually input your own default text
- DYNAMICALLY SET VALUE: Pull value directly from a dataset column
- USE A URL VARIABLE TO SET VALUE: Auto-fill using a URL variable
- USE PROFILE INFO AS VALUE: Auto-fill with meta data from the user’s profile

CUSTOM FORM STYLING
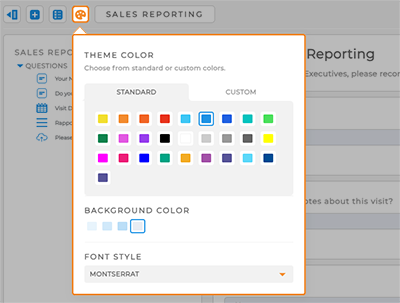
Want to customize your form even further? Click the style icon to change your theme color, background, or font! This is a great way to reinforce brand colors or use custom colors to easily differentiate between different teams.
Once you’ve saved your settings, share this form with your team and start collecting the data you need in real-time!


